
Fast affordable headphone measurements with SignalScope X and miniDSP EARS
Measuring your headphones and in-ear monitors just got a whole lot easier! If you have been looking for a convenient and affordable way to check the performance of your headphones or IEM’s, the combination of SignalScope’s Dual FFT Analyzer and miniDSP’s EARS calibrated headphone measurement system offers a great solution.
The EARS User Manual indicates that EARS is “designed to be a useful and practical tool for headphone enthusiasts.” It then offers the following suggested applications of the EARS measurement jig:
- Check that your headphones are operating correctly e.g. balance of left/right frequency response.
- Take measurements that you can use as a basis for equalizing your headphones.
- Observe the effect on frequency response of different earpads and eartips.
- Measure the effect of modifications to the headphones.
- Compare your headphone measurements with other EARS users.
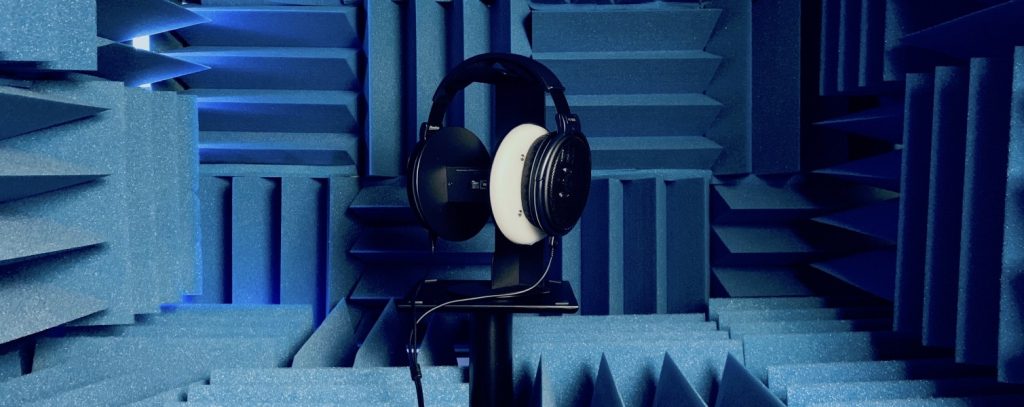
Using the Dual FFT Analyzer tool in SignalScope X or SignalScope Pro 2018 (version 10.7.2 or later), calibrated measurements for each of these suggested tasks can be made quickly and easily. The following brief tutorial walks you through the process of measuring the frequency response of a set of headphones with SignalScope X running on an iPad (these same measurements can be made with SignalScope X on an iPhone or iPod touch).
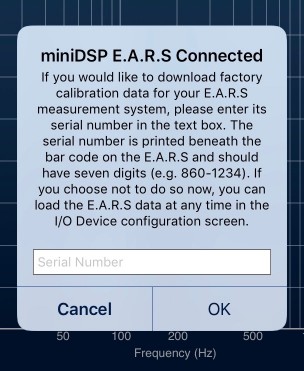
- When the miniDSP EARS system is first connected to your iOS device running SignalScope X, you will be prompted to enter the serial number of your EARS device. Take care to enter your serial number correctly, since an error in the serial number will result in the wrong calibration data being loaded for your device.
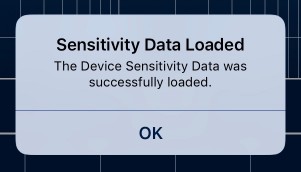
- After entering your serial number, SignalScope X will confirm that the factory calibration data for your specific device has been successfully downloaded from miniDSP’s website and loaded into the app.
- Open the I/O Configuration menu (tap the microphone icon on the left side of SignalScope X’s main toolbar). In this menu, you can confirm that the EARS device is selected and that the gain is set where you want it. SignalScope X also supports manual calibration of each input microphone. If you ever need to reload the factory calibration data, you can tap the Reload Factory Calibration button.
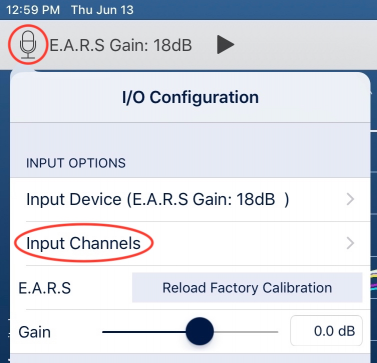
- Tap on Input Channels to bring up the input channel configuration menu for the EARS device. In this menu, you can confirm the calibrated acoustic sensitivity of each microphone channel. Channel 1 is the channel for the left ear microphone and channel 2 is the right side.
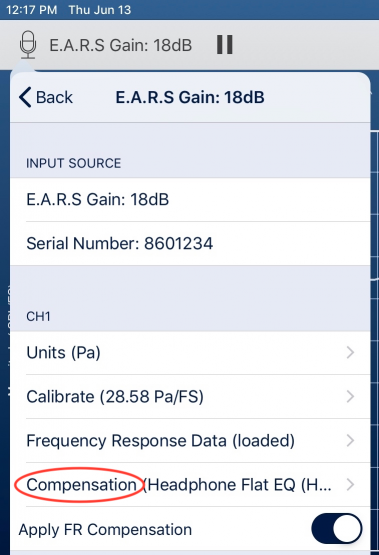
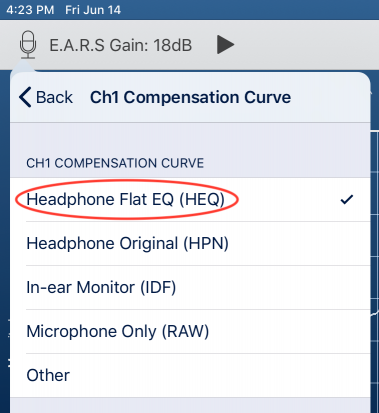
- Tap on Compensation to open a selection menu for the various frequency response compensation curves provided by miniDSP for different measurement scenarios. In this example, we selected Headphone Flat EQ. If you want to use your own compensation curves, this is also possible. To do so, you can select Other and then return to the input channel configuration menu, where you can load your own frequency response data.
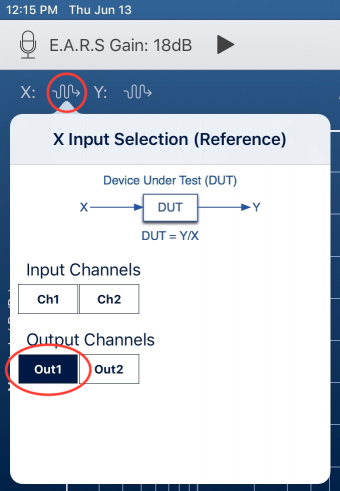
- Close the I/O Configuration menu and make sure you have selected the Dual FFT Analyzer tool (the Dual FFT tab). Then open the X Input Selection menu (on the left side of the Dual FFT’s toolbar) and make sure that output channel 1 is selected as the reference input.
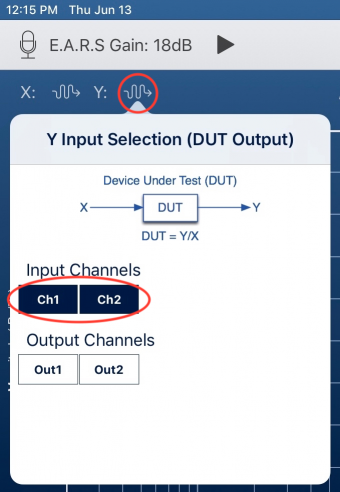
- In the Y Input Selection menu, it is possible (as of version 10.7.2) to select 2 input channels to make 2 simultaneous frequency response measurements. In this case, select input channels 1 and 2 for the left and right ear microphones, respectively.
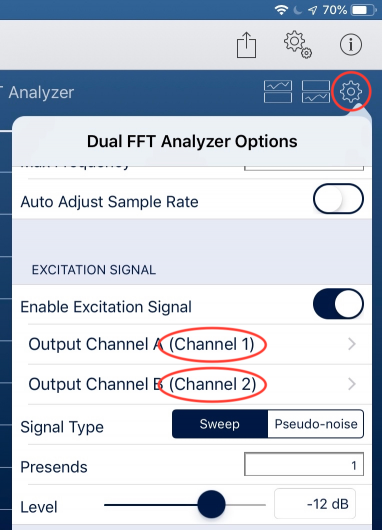
- On the right side of the Dual FFT’s toolbar, open up the tool’s main options menu. Scroll down to the Excitation Signal section and make sure the excitation signal is turned on. Then, select channel 1 for Output Channel A and channel 2 for Output Channel B. This is also a new feature in SignalScope X version 10.7.2. It allows you to send the excitation signal to both sides of the headphones, so you can measure both sides, simultaneously. Since the same excitation signal is sent to each output channel, both sides can be measured using just one reference input channel, which we selected previously.
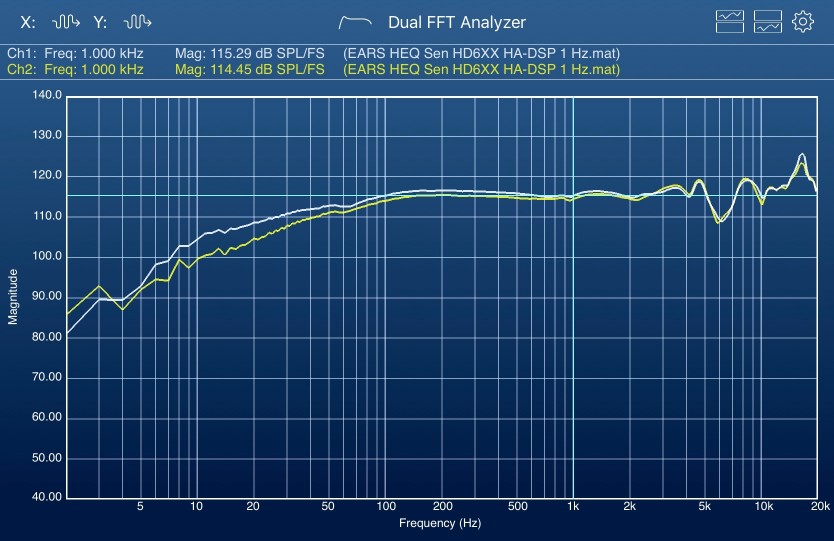
- You can configure the frequency resolution of your measurement as you like. In the example, below, the resolution was set to 1 Hz. When you’re ready to make your measurement, place the headphones on your EARS device and make sure they’re connected to the selected audio output path of your iOS device. Then press the start button. You should see something similar to the example, below. Once you’ve captured your measurement, you can save it in a CSV or MAT file. The data can then be loaded back into the Dual FFT Analyzer to overlay it with other measurements for direct comparison or to generate high resolution PDF images. Data files can also be exported for analysis in third party software or to share with friends and colleagues.
- As an exercise, take a moment to switch between the different compensation curves provided by miniDSP, repeating the measurement each time, and look at the effect each curve has on the frequency response, particularly at higher frequencies.
- After you’ve been through this tutorial once, you can see how easy it is to swap out headphones or make other adjustments and then measure and compare the results.
- Enjoy!
Important Notes:
- The calibration accuracy depends on the accuracy of the data provided by miniDSP, unless you perform your own calibration. Generally, calibrating your own equipment is recommended if you have access to the equipment and the know-how to do it.
- We have tested this process driving the headphones with the built-in headphone jack of an iPad, the miniDSP HA-DSP headphone amp, and the AudioQuest DragonFly Red.
- We saw good agreement between the 3 of them.
- It should be noted that it was more challenging to get consistent results and good coherence at higher frequencies with the DragonFly, which we believe may be due to its asynchronous USB audio transfer. Best results with the DragonFly were obtained using a smaller effective time window for averaging (higher overlap processing and a suitable number of averages). The asynchronous output technology is great for critical listening, but not necessarily advantageous for certain measurement configurations.
- Overall, it seemed easiest to get good coherence across the full audio band (20 Hz to 20 kHz) when using the HA-DSP to drive the headphones.
- An external (powered) USB hub was required in order to use the HA-DSP and DragonFly with the EARS system, since only 1 USB port is offered by the iPad USB adapters.
- It would be ideal if the EARS headphone test system had its own USB output channels, operating on the same sample clock as its microphone inputs, and a headphone amp.
- It should be kept in mind that crosstalk is possible between the headphone on one side and the ear microphone on the other. However, in our tests, the crosstalk had a negligible effect on the measurement and measuring both sides simultaneously was most convenient, even with Massdrop x Sennheiser HD 6XX open-back headphones. Your results may vary.
- Although the combination of SignalScope X and the EARS measurement jig makes it easy to measure the frequency response of your headphones, it can remain challenging to get consistent, reliable measurements.
- It is recommended that you reposition the headphones on the EARS jig several times, making a new measurement each time. This will illustrate the sensitivity of the measurement to the placement of the headphones and give added perspective on the reliability of the results.
- A quiet location is highly recommended for best measurement results.
- Additional guidance is offered in the EARS User Manual.
- Further explanation of some of the challenges associated with measuring headphones can be found in the following articles by Tyll Hertsens at InnerFidelity:
- From the EARS User Manual:
- Please note that EARS is not an industry-standard measurement head. Even expensive (i.e. tens of thousands of dollars) heads can produce measurements that are different to each other. Our goal with the EARS is to produce something that is affordable and fun to use!
- In order to connect the EARS system to an iOS device, a Lightning to USB adapter is required. Newer iPad Pro models require a USB C to USB adapter.
- A Pro Tool Set subscription is required in order to use the Dual FFT Analyzer tool in SignalScope X.
