
How do I calibrate my microphone with SignalScope or SoundMeter?
If you would like to make accurate sound level measurements with your iPhone, iPad, or Mac, then proper calibration of your microphone sensitivity is an important step to success. With the right equipment, calibrating a microphone can be a very simple process. However, it’s important to have at least a basic understanding of microphone sensitivity and what calibration really means.
What is Calibration?
Let’s start by talking about how the acoustic signal (sound) makes its way into an app, like SignalScope. A microphone is a transducer, which means that it converts one form of energy to another–in this case, acoustic energy is converted into electrical energy. The electrical output of the microphone must then be converted to a digital form (a stream of numbers) that can be read and understood by a computing device, such as an iPhone or Mac. In order for these digital values to correspond to physical quantities, such as sound pressure, sensitivity values are used by the software. Calibration is essentially the process of determining the right sensitivity values the software must use to yield accurate measurements.
Consider the diagram, below. When a microphone converts sound to an electrical signal, it does so with a certain sensitivity. Sound pressure is measured in units of pascals (‘Pa’ for short) and electrical signals are measured in units of volts (‘V’ for short). A typical 1/2-inch measurement microphone may have a sensitivity of 50 millivolts per pascal (50 mV/Pa), which means that a sound pressure of 1 pascal on the diaphragm of the microphone will yield 50 millivolts at the microphone’s output. This microphone sensitivity value is an essential value, but it still doesn’t provide enough information. The analog electrical output of the microphone must still be converted to a digital signal and this conversion must also be considered.
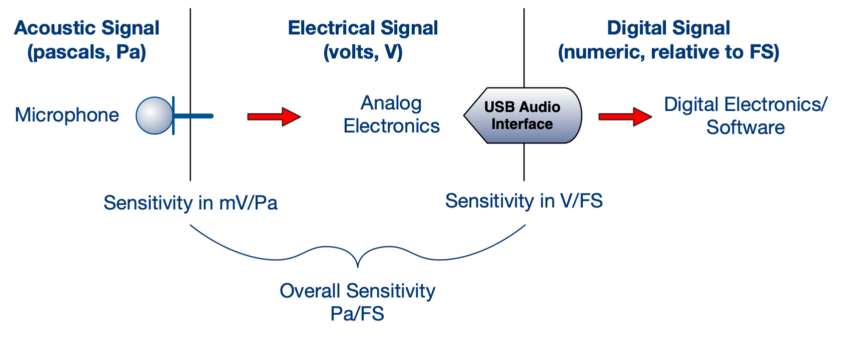
An analog-to-digital converter (ADC) of some kind will necessarily be part of the signal chain between the microphone and the computing device. The ADC will have some full-scale value (FS), which is the largest number it can use to represent the incoming signal as a digital value. This full-scale value will be associated with some input voltage level. If we know the full-scale input voltage, we can use that information, along with the microphone sensitivity, to accurately measure acoustic pressure values in the software. In SignalScope and SoundMeter, the sensitivity of voltage inputs is expressed units of volts per full-scale value (V/FS). For measurement microphones with an analog output, we can calculate the microphone sensitivity, in mV/Pa, separately from the input voltage sensitivity, in V/FS. This can be useful if you are working with an analog input device (typically a USB Audio Device) for which you already know the voltage sensitivity and you are connecting a microphone for which you also know the acoustic sensitivity. However, some of the microphones in our list of recommended mics have a built-in ADC, which means that we don’t have means to separate the acoustic sensitivity from the voltage sensitivity. In this case, an overall sensitivity, which relates sound pressure directly to the digital full-scale value (Pa/FS), must be used.
For help choosing a measurement microphone to work with, including some USB Audio interface and microphone calibrator suggestions, check out “Which measurement microphone should I use with iPhone, iPad, or Mac?“
Let’s Calibrate
The instructions, below, are the same for SignalScope and SoundMeter.
- Apply a known sound level to the microphone.
- The best way to do this is with a microphone that fits a standard acoustic calibrator. See suggestions for microphones and calibrators, here.
- If you have a suitable calibrator for your microphone, insert the microphone into the calibrator and switch the calibrator on. Then, proceed to Step 2.

- If you don’t have a suitable calibrator for your microphone, you will need to calibrate your microphone relative to a sound level meter that has already been calibrated. You can produce the reference signal with a signal generator connected to a loudspeaker (with a suitable amplifier in between, of course). If you have access to the Signal Generator tool within SignalScope or SoundMeter, you can use that as your generator. You can then measure the sound level at a fixed location with your calibrated meter, remove the meter, and place your microphone as close to the same measurement location as possible (and with the same orientation).
- A 1 kHz tone at 94 dB is typically used for microphone calibration.
- Performing a relative microphone calibration in a quiet, non-reverberant location is recommended.
- Make sure the tone generator is turned on (in the Signal Generator tool, if you’re using the app for it) before proceeding to the next step.
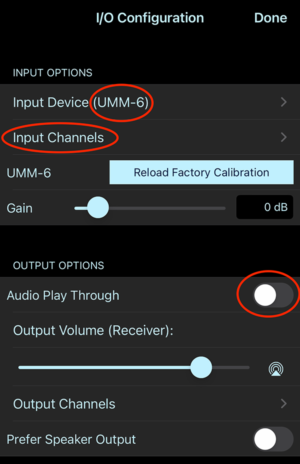
- In the app, open the I/O Configuration menu.
- The I/O Configuration menu is directly accessible from the left side of the app’s main toolbar by tapping the microphone icon.
- In the top row of the Input Options section, make sure the desired input device is selected (its name will be shown in parentheses).
- If you’re using the app’s built-in signal generator for a reference source, make sure Audio Play Through is switched off in the Output Options section of the menu.
- Under Input Options, tap on Input Channels to open the configuration menu for input channels.
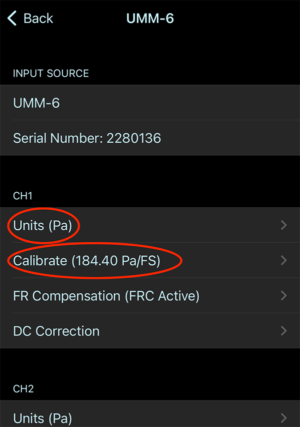
- For the channel that your microphone is connected to, make sure the Units selection is set to Pa (pascals).
- Tap on Calibrate for the channel your mic is connected to.
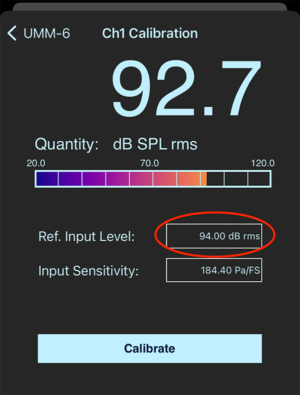
- The Calibration view displays the current measured input level as a text value as well as in a horizontal bar meter. If the current measured input level agrees with the reference sound level you have applied to the microphone (and there’s no indication of input clipping), then you’re done–your microphone already has the correct sensitivity applied.
- Make sure your input is not clipping (you should not see the word “clip” displayed with a red box around it in the upper left-hand corner of the screen). If it is, you will need to decrease the level of your reference input signal. When the input signal is no longer clipping, the red box around the word “clip” will disappear.
- Enter the reference sound level into the Ref. Input Level text box. If you’re using a calibrator, this level will typically be 94 dB, although some calibrators also support setting the calibration level to 114 dB.
- Wait a few seconds for the measured level to stabilize.
- Tap the Calibrate button.
- Confirm that you would like to Calibrate.
- Now, check to see that the measured input level closely matches the level of the reference signal. If it does, your microphone is properly calibrated.
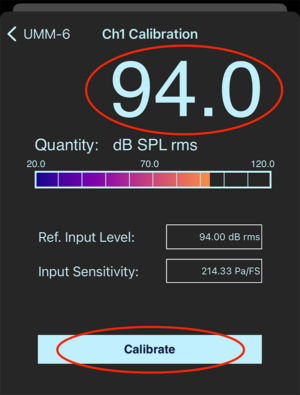
- Tapping the Calibrate button causes the app to automatically calculate a proper sensitivity for the microphone, based on the current measured input level and the Ref. Input Level value.
A Note About Input Gain
Some USB Audio interfaces have user-settable input gain. For some interface hardware, the gain is set via a physical knob on the device and for some devices it can be set within the app. Input gain is like a volume control in the sense that the level of the signal received by the app increases as the input gain is increased. Any change in the input gain will affect the microphone calibration. So, it is important to set the input gain where you want it before calibrating the microphone and then to make sure that the gain doesn’t change after calibration. If the gain is changed, then calibration will need to be performed again for the new gain setting.
Traditional sound level meters have a ‘range’ setting that allows the meter to be configured to accommodate a higher or lower range of sound pressure levels. Input gain allows you to do the same with SignalScope or SoundMeter, although it is important to remember that increasing the input gain will decrease the maximum sound level you can measure–that is, higher gain means lower range. Another way to look at it is that increasing the gain will increase the sensitivity of the microphone signal path. An increased sensitivity is what you need to measure softer sounds (lower sound pressures).
If you would like to learn more about measuring sound with mobile devices, take a look at this article in Acoustics Today Magazine: “Acoustical Measurements with Smartphones: Possibilities and Limitations“


Pingback: Which measurement microphone should I use with iPhone, iPad, or Mac? – Faber Acoustical Blog
Pingback: SignalScope and SoundMeter now support Dayton iMM-6C microphone – Faber Acoustical Blog